What is Edge Painting?
Edge painting at its surface sounds pretty simple – it’s a process by which color is applied to the edges of cards, invitations, even books or journals. Edge painting can be done in any color, including metallics and foils (!), and is usually mixed by hand to be matched to a specific Pantone colour.
While edge painting is a commonly used technique, there is a whole lot of mystery surrounding the process – and printers seem to have different methods or processes for applying edge paint. Today we have Michael from Czar Press walking us through his edge painting process and removing some of the mystery from this popular technique!
The Process
The edge painting process takes place after all graphics and text have been printed and all paper materials cut down to size. For this example, we’re focusing in on a recent business card project. I like to make sure my blade is especially nice and sharp when trimming out cards that are going to be edge painted.

Edge painting involves a padding press (pictured above), ink, and a brayer. The cards should be stacked on the padding press, making sure that the cards are pressed against one wall of the padding press as evenly as possible. Crank down the vice(s) on the press, applying pressure to the cards, making them nice and snug. Remove the outer wall off the padding press, leaving one side exposed. This the side that will receive the ink.


Then using just a little bit of ink, ink up your brayer. Roll the brayer around and around on a piece of glass if possible in attempt to make the ink spread even across the brayer roller. Then I apply the ink to the exposed side of the card, applying as little pressure as possible with the brayer to get good ink coverage on the cards. Once the ink has been applied, I like to gently wipe down the inked side of the cards with a cotton cloth to remove any excess ink. Let them dry for a while – maybe an hour, depending on conditions – until they are dry to the touch. Put the outer wall back on the padding press, spin the cards around to the next side and repeat until all sides are complete.


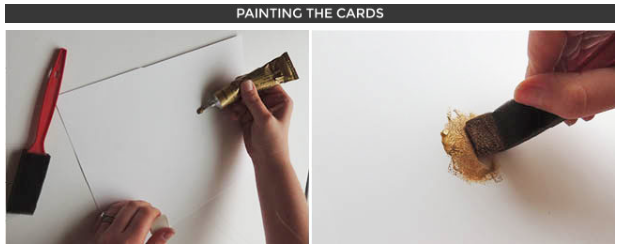
This example demonstrates a more DIY approach using elastic bands.

2. Spray two , even coats on the edges that are not covered by the rubber bands. Allow them to dry. I’m impatient so I only waited about 10 minutes. If you’re more patient than me it’s probably better to wait around 20 minutes.
3. Rotate the rubber bands 90 degrees and spray another 2 coats on the other 2 sides. Allow them to dry completely then bring your cards indoors and carefully separate them and place them on a table, not overlapping. I covered my desk with paper to protect the surface because the gold paint will rub off a tiny bit at first. Allow them to dry overnight to make sure the paint cures a bit and you’re done!
This next example uses a slightly different approach of using a clamp, paint and sponge brush.

2. Ink. I used Riso paper ink used in Gocco printing. I figure you can’t go wrong with ink that is specifically used on paper for crisp lines and fine detail.
3. Sponge brushes.
4. Clamp (not pictured). If you don’t have a clamp or don’t want to purchase a clamp, a heavy book or rock will do. However, I truly think the reason my cards turned out so well was because of the clamp. Once the cards were secured, there was NO shifting resulting in very minimal bleeding and crisp painted edges. Also the clamp was easy to rotate and maneuver to make sure all edges were throughly painted.

First, I stacked all of the cards together and rotated sections as needed to get them as flush as I could up against one another. Note that the top and bottom card that you use will be ruined. I kept the top and bottom card from the first round I did and will continue to use them in the future to sandwich edgeing projects to keep wasted/ruined cards to a minimum. Once I felt I had the cards stacked well, I pulled out my clamp and wedged the stack between the clamp’s teeth.

I think this step is THE MOST IMPORTANT step. I spent a good five minutes working with the cards in the clamp trying to get them as straight and even as possible. Any cards sticking out or sinking in will result in ink on the faces of the cards, not the edges. You want to get them as square and even with each other as possible both horizontally and vertically. Once I felt I got them in a good position, I tightened the clamp tight. You don’t want to see any gaps or shadows between cards- these will result in bleeds. Not good.
I squeezed some ink onto a piece of paper and worked it into the sponge. The first round I did, I tried brushing the ink onto the card edges. The ink looked really streaky and uneven. I found that using the sponge brush correctly and dabbing the ink onto the card edges worked 100 times better and gave good, even, saturated color and coverage. When dabbing, dab LIGHTLY and repeatedly. It will take time to get the coverage you want, but you just have to be patient. The first time around I did not dab lightly and I’m 100% sure that being rough forced ink between the cards causing a little bit of bleeding. The second round I took my time and did not have a single card that had bleeding on it’s faces. ALSO, when I was dabbing, I squeezed the cards together as I dabbed just to make sure that there were zero gaps/spaces between the cards when I was laying down the ink. Thankfully, this ink is quite thick so once you have finished dabbing the ink on the edge and release the pressure from the cards you won’t have to worry about ink seeping through.

After you have finished covering all edges, set them aside to let them dry. I spot checked the edges with my finger after about 30 minutes and they were mostly dry to touch. I took them out of the clamp and laid them out individually to finish drying just to make sure I didn’t have any stick together permanently while they dried overnight.
No comments:
Post a Comment